Showing posts with label craft. Show all posts

Tuesday, July 13, 2010

Pom-Pom Euro Shams


In case you're wondering how I made the Euro shams in our guest bedroom, I'll tell ya!

Okay, I'm not real sure about how to successfully do this "how-to" thing, but I'll try.

To make two Euro Shams you'll need:
           - Two euro sham pillow forms.  (about 26 x 26)

           - 1.5 yds fabric for the front of pillow (fabric A) (or about a yard of fabric if fabric width is 54 in. or greater).  I would suggest something upholstery weight, but it's not mandatory.

          -  2 yds fabric for the back of the pillow (fabric B) (If you use something really cheap, like unbleached muslin, like I did, you may want to think about doubling the amount and double layering it for durability)

          - 6.5 yrds of pom-pom trim (or other trim of your choice)

          - Thread that matches your back pillow fabric


Okay, here goes nothin...
(To make things simple these instructions are for 1 euro sham.  If you are making two, do everything twice!)

1. Cut out a 27"x 21" and a 27"x11" piece of Fabric B.

2.  Iron them (and starch if you think your fabric needs a little extra help).
3.  Fold under 1" on the 1 long side of each peice and pin. Blind hems are too much trouble in my opinion so just make sure your thread matches and just sew a straight light to hem them under.  
4.  Cut out a piece of Fabric A that is  27" x 27".
5. Lay out your hemmed pieces of Fabric B, both pieces facing right-sides-together with your square of Fabric A.  The hemmed edges of Fabric B should be towards the center, and the panels should overlap.    

6. Pin a 27" strip of the trim in between the two pieces, lining up all three edges.  The decorative part of the trim should be towards the center of your square.  
7. Adjust your needle to the left.  
 8.  Sew along the edge of your fabric, the width of the presser foot is probably a good guide for how wide your seam allowance should be, but if not you're seam allowance should be the same as the wide of the tab of your trim.  Pull out the pins as you go so you don't run over them.  Carefully watch to make sure all three edges remain lined up as you sew.
 9.  It should look something like this after you've sewn your seam.
 10.  When you turn it right-side-out your seam should look like this.
11. Repeat along all four sides of the square, so that one of the pieces of Fabric B is overlapping the other to create an opening to slide your pillow form in.  


12.  Clip the corners, without clipping through your seam.  
13.  Turn right side out and Voila!  (Or if you're like me, this is the point when you discover something has gone tragically wrong and you have to rip out several seams and do them again).  Stuff your pillow form inside and enjoy!


Monday, July 5, 2010

Sewing, Sewing...

I've been busy all weekend sewing my new cafe curtains!  I can't wait to post pics when they are finished!

Here are my fabrics...


Tuesday, May 25, 2010

No-Sew Burlap Bedskirt

We have our bed on risers, which I definitely recommend.  It provides a lot of extra storage underneath and gives your bed a grander look.  However, putting your bed on risers poses a problem for your bedskirt.  In order to get a bedskirt that's long enough, you usually have to buy from a more expensive store or have one made.  When I saw how to make a burlap bedskirt on Nest Egg, I knew it would be perfect for our bedroom and guest bedroom.  It was cheap (about $2.99 per yard) and it didn't involve me getting out my sewing machine, which for some reason I avoid like the plague (Probably because I was an apparel design major and I associate sewing with late night last minute overdue school projects).  

I measured the length around 3 sides of our bed and multiplied by 2.  That's how much burlap fabric I bought.  

I laid the burlap along the edge of the box springs, and draped it to the length I wanted it and cut off any excess fabric.  With burlap you can easily see the weave with your eyes, so focus and cut along the weave.  Don't try to cut what you think is straight, follow the weave.  
I gathered and pinned, gathered and pinned all the way around the box springs.  It was very tedious.  I used spiral beskirt pins ($2.99 from Bed Bath and Beyond, click picture to buy).  Don't try to use straight pins,  I tried that and it won't work!
Here's the progress...
So after all that work, here's how it turned out...
Dangit!  You can barely even see it.  It's because we have a king size duvet instead of a queen.  (The explanation for that is here.)  
But, when when you're in the room, it really does make a big difference.  It's all about the details, folks.
Here's a sneak peak of how it looks in our guest room with a different color of burlap...
You can get burlap at JoAnn's and most other fabric stores in lots of different colors.

Thanks for reading!

Thursday, May 20, 2010

Old Shutters make an Easy Headboard

My sister, Emily, was putting new shutters on her house and had these old ones leftover.  The shutters were painted, but these are the backs, which are naturally weathered and distressed.  

We desperately needed a headboard for our bed, since our bed is in front of a window.  We couldn't sit up in bed without risking pulling down our blinds.  So, we knew Emily's shutters would be a cheap and aesthetically pleasing option (and much less work than my other idea to build an upholstered headboard).   

All we needed were the four shutters and two 2x4s.  
- We measured the width of the all the shutters put together.
- We cut the 2x4s to this length.
- Chris nailed the 2x4s in the back a few inches from the top and bottom edges of the shutters to keep them all together.  
- The shutters were the perfect height for our bed, so we just propped them between our bed and the window.  
The width of the shutters is actually a few inches narrower than our queen size bed, but it's hardly noticeable once its all setup.  

Our bed before:
Our Bed after: (along with a few other improvements)
I think it's fitting that we have shutters covering a window.  :)

Thanks for reading!


Wednesday, May 12, 2010

Oh, What You Can do with Spray Paint!

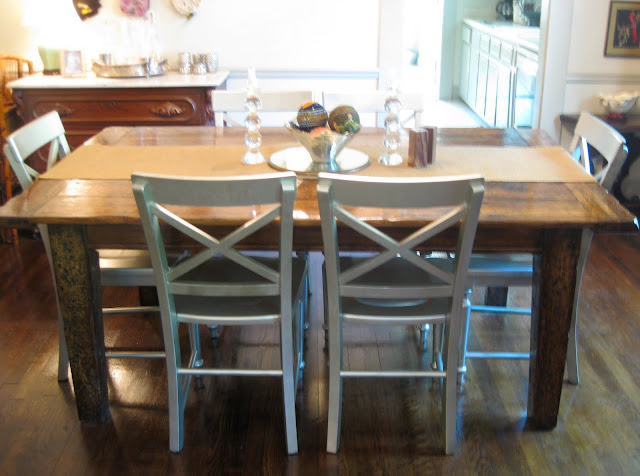
Here are were our dining room chairs.
They were my grandmother's and are beautiful antique chairs, but they were very rickety and probably better suited in a formal-ish dining room one day instead of bearing our daily use.  
My parents had 6 of these chairs in storage from their old lake house...
I wanted chairs something like this...


So I spray painted these chairs for a more contemporary feel...

In they went, and I was instantly so excited about the results!  They also serve to tie in the center of the room with the wall color.  

What I should have done:  Lightly sanded the chairs, primed them, and then brush painted them with semi-gloss metallic silver paint.
Why I didn't:  A gallon of metallic paint is around $75 (at Lowe's) and you have to buy it by the gallon!  And I think you have to buy the base color separately.
So I just:  Spray painted them with metallic spray paint.
How it's workin' out:  Pretty good, they have chipped a bit on the seats, but it'll be super easy to just drag them out to the yard once in a while and spray them again!
I guess I could have:  At least, primed them with a spray primer before spraying them silver.
But then:  It would have probably been an extra day or two before I could see the results, and that was NOT an option.
Would I do it this way again:  Yes!!!  Besides the intense finger cramp after 6 chairs, it was pretty painless and cheap!
  

Thursday, April 22, 2010

How I made the antler mobile...

It all started when I asked my mother in law to bring us some antlers.  I was thinking like...a pair of antlers.  I was going to mount them over the archway in our living room.   

Well she sent over a box full of antlers...(these are just the few that were left over)... 
None of the antlers had mountings so I decided not to hang them over the archway, because it would take quite a lot of rigging to get them to hang straight.
I started brainstorming another way to incorporate them into the room.  
It always bothered me how the screen behind this chair really leads the eye up to.....nothing.
I started arranging them in different ways until I came up with the idea to make a mobile, a perfect solution to go over the chair in our living room.
I started tieing the antlers together with twine.  I tied two smaller sets of antlers together first, then two larger sets, the stacked the larger sets over the smaller ones and tied them all together.
 But this wasn't really stablizing the antlers to stay in "formation".  
I remembered some extra burlap I had and cut a strip of that.  (Burlap comes in so handy for so many different projects!)
First Chris tied some big twine rope around the antlers for me.  I can't tell you what type of knot he did...just call your local boyscout.  Then I tied the strip of burlap around that.  I tied it like you would the ribbon on a present (making a cross at the bottom), then tucked in the loose ends at the top.   
Then the tricky part came along...hanging it.
First I tried just a regular screw hook.  It immediately pulled right out of the sheet rock.  The antlers are much too heavy for that.  So Chris went to Lowe's and investigated and bought this screw that has some sort of built in anchoring system.  Chris tied another some sort of cowboy knot for the screw to hook through.  
The hook is quite shiny and white, so I've been meaning to go back and paint it the flat ceiling color.  It's too bad we couldn't use a cooler, more rustic hook...but I'm not too crazy about the idea of our ceiling caving in...or the antler mobile crashing down on someone's head!  

So here's how it turned out...

Thanks for reading!  

Tuesday, March 30, 2010

Bathroom Shelving DIY

Here are some shelves I made for our bathroom...
It all started with some wood shelves I found in our basement...
Okay, actually it all started with a Southern Living Magazine that showed this nifty little shelf project.
But then it all started for ME, with the shelves I found in our basement.
I used:
3 shelves 21"x 8"
6 dowels 4" long
About 130" rope
1 strong hook
2 brackets
Minwax wood stain in Dark Walnut
Polyurethane (High Gloss) (Matte finish would probably be better, but I already had the gloss on hand)
Paint brushes
Power drill (with an attachment to drill large holes)
Chris drilled the holes for me.  We measured the diameter of the rope and that's how big we made the holes.

I stained them with the dark walnut stain I already had around.  I painted the stain on the shelves, waited about 5 minutes then wiped it off.

I made sure to get the stain down into the rope holes.

I let the stain dry, then coated them with Polyurethane.  I already had high-gloss poly and so I used that, but I think they would have been more rustic in a matte finish.  I let that dry for about 48 hours.

I measured in the bathroom where I was going to put the hook and about where I wanted the shelves to hit.  I took the rope through all three shelves, then tied a big knot at each end after passing through the third (bottom) shelf.   Chris drilled in the hook for me.  I don't really understand it, but Chris explained to me that the hook had to be really high or else the shelves would want to flip backwards.  Who knows...I just listen to the man when it comes to physics!

Once I had the shelves hanging by the rope, I placed each shelve to the desired height using the dowels.  
I considered what items I wanted to put on the shelves when deciding on the height for each shelf.

Chris then used a nail gun to shoot nails through each shelf diagonally into the wall to keep the shelves in place.  (They don't tell ya THAT in Southern Living)
Then I accessoried!
After a few hours with my makeup basket on the lower shelf, it really started to sag!  So I added two brackets, which I painted with my trusty hammered metal spray paint.  
Although the brackets hurt the illusion of the shelves a bit, I don't mind them too much because they're only on the bottom shelf and you don't really notice them from eye level.  

Voila!
Because I already had the stain, poly, and the wood for the shelves...the whole project cost me under $10.

LinkWithin

Related Posts with Thumbnails