Tuesday, March 30, 2010

Bathroom Shelving DIY

Here are some shelves I made for our bathroom...
It all started with some wood shelves I found in our basement...
Okay, actually it all started with a Southern Living Magazine that showed this nifty little shelf project.
But then it all started for ME, with the shelves I found in our basement.
I used:
3 shelves 21"x 8"
6 dowels 4" long
About 130" rope
1 strong hook
2 brackets
Minwax wood stain in Dark Walnut
Polyurethane (High Gloss) (Matte finish would probably be better, but I already had the gloss on hand)
Paint brushes
Power drill (with an attachment to drill large holes)
Chris drilled the holes for me.  We measured the diameter of the rope and that's how big we made the holes.

I stained them with the dark walnut stain I already had around.  I painted the stain on the shelves, waited about 5 minutes then wiped it off.

I made sure to get the stain down into the rope holes.

I let the stain dry, then coated them with Polyurethane.  I already had high-gloss poly and so I used that, but I think they would have been more rustic in a matte finish.  I let that dry for about 48 hours.

I measured in the bathroom where I was going to put the hook and about where I wanted the shelves to hit.  I took the rope through all three shelves, then tied a big knot at each end after passing through the third (bottom) shelf.   Chris drilled in the hook for me.  I don't really understand it, but Chris explained to me that the hook had to be really high or else the shelves would want to flip backwards.  Who knows...I just listen to the man when it comes to physics!

Once I had the shelves hanging by the rope, I placed each shelve to the desired height using the dowels.  
I considered what items I wanted to put on the shelves when deciding on the height for each shelf.

Chris then used a nail gun to shoot nails through each shelf diagonally into the wall to keep the shelves in place.  (They don't tell ya THAT in Southern Living)
Then I accessoried!
After a few hours with my makeup basket on the lower shelf, it really started to sag!  So I added two brackets, which I painted with my trusty hammered metal spray paint.  
Although the brackets hurt the illusion of the shelves a bit, I don't mind them too much because they're only on the bottom shelf and you don't really notice them from eye level.  

Voila!
Because I already had the stain, poly, and the wood for the shelves...the whole project cost me under $10.

Sunday, March 28, 2010

Designer Dog "Bedding"

I was tired of looking at this:
(Blanket covering our dog crate)
So I made this...


Aaaaahhh.  My eyes can rest.

Here's how I made it...
Since every crate is gonna be different, I'm including formulas that correspond to this picture instead of actual measurements.
What I bought...
-A few yards of outdoor fabric Outdoor fabric is resistant to stains and fading, and it's extra sturdy, i.e. hard to tear up.  You'll need roughly (Bx4) + D + C inches of fabric, then divide that by 36 to get the yards.  It depends on the width of the fabric and how big your crate is, because if A is half the width of your fabric, you may be able to cut out some of that yardage.

-Several packs of double wide bias binding tape.  Total yardage of biased tape should be (Ax4) + (Bx8) + (Cx2) + 12".

-Thread that matched my fabric and thread that matched my binding tape

-I'll probably go back and by some rickrack to make decorative stripes on the cover.

Making the Cover...
Panel #1  (C wide and B+B+D long)
I cut one large rectangular panel large enough to cover the top and sides of the crate in one swoop.  I trimmed it out by sewing on bias binding tape (cuter and easier than turning under the edges).

Panel #2 (A wide and B + 2" long)
Then I cut a square flap for the back end of the crate and trimmed it with bias tape (on three sides).  I made this flap the full size of the back end, with a little extra length on the unfinished edge to sew it to the top panel.  I sewed it onto the top panel (like I'm making a cross shape).

Panel #3 (D wide and B + 2" lon)
Then I cut a flap the size of just the front door (not the full size of the end of the crate) and trimmed it out with bias tape (on three sides).  This panel will be a little narrower than the back panel. I made this flap narrower so it will allow the dog to go in and out when the door is open, and it allows ventilation into the crate.  I left a little extra length on this panel also and sewed it to the main panel at the unfinished edge, completing the "cross" shape".

Here's how it looks all laid out, to give you an idea of the "cross" shape.


This four flap design is great, because you can easily lift a flap from any side to check on your pup!

But then I realized I had to find a way to attach the cover to the crate, or BeiBei would pull it right off.  Although buttons or ties would have been cute, I couldn't do anything she would want to tear off.
I discovered that there are little hooks going all round the top edge of the crate.  So I measured where the hooks were and made four little loops out of the bias tape to attach to the hooks.
I think I'm gonna add some more bias tape to make a few stripes on the bottom edge of the end flaps.  Maybe I'll do a little rick-rack!

So here's how BeiBei's crib's lookin' these days.  We'll probably put the crate back under the table eventually, but she likes to hang out under the table like a little fort...so I'll let her have her fun.  
And just for fun, here's the little cutie herself after digging some holes in the backyard...
And in the car...
I'm a little obsessed...I know.

Thursday, March 25, 2010

Small Bathroom Makeover

As mentioned in the previous post, water damage from the roof had completely rotted the walls and ceiling in our "middle" bedroom, as well as the neighboring bathroom.
Here's the before picture of the bathroom in our house when we bought it. 
Repairing the exterior wall in the bathroom would mean knocking out all the shower tile on that wall.  This is 1940s tile we're talking about, and we knew we wouldn't be able to match it.  So, knocking out all the tile was our only option.  When you knock out tile, you will pretty much destroy the wall behind it.
Ripping out the walls and the tile...
Once we had to knock out three walls of the shower, we went ahead and gutted all the walls in the bathroom as well as the rotten ceiling.  It was a good excuse to give our bathroom a fresh start.  The walls were covered in layers of soggy wallpaper that we'd spent hours unsuccessfully trying to remove.  There was a huge cutout hidden behind the mirror that used to hold a recessed cabinet mirror.
Exterior Wall (after rotten wood was replaced)...
A tub full of tile and plaster debris...

The guys did the demo, I did the clean up.  We had to wear masks and goggles because the dust from the plaster was so bad.  A giant mess...
With some help from "Paul the Builder", Chris put in new plumbing for the shower, sink, and toilet...

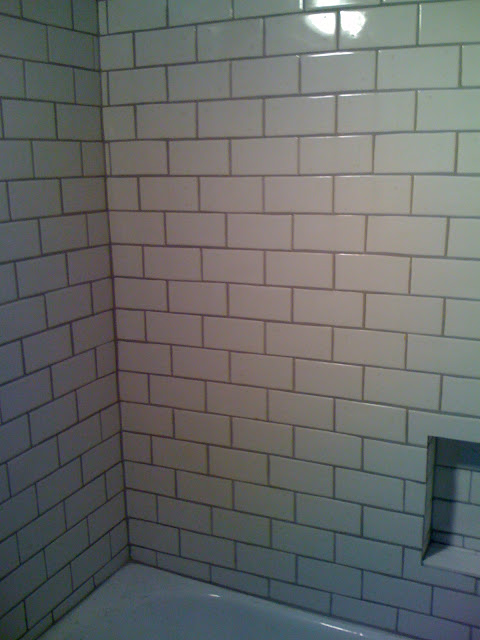
He put up moisture resistant backer board for the tile, along with a nifty little place for our shampoo bottles...

Then, due to the wise advise of many, we paid someone to come tile the shower. 
We selected white Florida Tile Retro-Classic Flair in a subway pattern with "dove gray" grout.  We used the gray grout to tie in our trim color.     
Chris, with the help of our Pastor Murray Lee and his dad (amateur "practically professional" electricians), rewired so that we could have sconces above the sink instead of one light in the center.  They also put in a fan/vent and a recessed light above the shower.  Chris dry-walled the whole bathroom (With Tom and David A's help) and then we added a beadboard wainscoat and crown moulding.  
Then it was time for the creative part of the re-do to kick it.  
This was my inspiration (from Southern Living)...
I wasn't trying to replicate this bathroom exactly, but something about inspired me towards a little bit of a funky, rustic feel.  
So, I began the draining process of testing paint colors.
I knew I wanted to incorporate some of the same colors from the rest of the house for good flow, but I wanted to have a little extra fun with it.  I finally settled at white walls (I matched the shower tile to a swatch of white).  I wanted the walls to blend right into the tile and give the bathroom a light airy feel.  I chose to use Benjamin Moore's Sandy Hook Gray HC-108 on the beadboard to go along with the rest of the trim in the house.  I also used Sandy Hook on the crown moulding.  For my funky pop of color, I used Benjamin Moore's Wasabi Aura AF-430.

We broke the old sink, and it didn't have much personality anyway.  So we got this sink at Lowe's which  is a little bigger.  It does crowd our small bathroom a bit, but it provides a LITTLE bit of room to set your soap and toothbrush.  The sconces I chose are actually outdoor wall lights from Lowe's by Portfolio.  Overall I prefer all their outdoor lighting, so don't rule it out when selecting for indoors (especially if you're on a budget and don't  have a lot of options)!  
They didn't have this light fixture at the time but I like it too if you're in the market...

We then added a towel ring by the sink and a towel bar by the toilet.  
(Shhh...the towel bar really just holds our pretty monogrammed towels...I don't allow anyone to use those)  We put two hooks on the side of the cabinet for the towels we use everyday.  

I already had curtains that I bought at Target from the Shabby Chic collection. (This may be it, but I can't tell.  Mine is swiss dotted).  They're about $19 per panel.  In our apartment I used two for the shower and two for our windows.  I sewed them all together and used all all four of them for a shower curtain to achieve an extra gathered effect.  Because the shower curtain is made up of pocketed panels, I had to use two shower rods--One in front, extra high up for the pretty curtain, then one in back to hold the shower liner.  (It actually works out great this way, because it's hard to push the curtain open because it doesn't have rings.  So we end up just opening the liner and to get in an out and the curtain stays closed.  This way no one has to remember to shut the shower curtain and our bathroom stays looking pretty!)  I originally wanted the curtain to be ceiling height.  It's 84" which is not long enough for ceiling height, but I actually like it better because it opens up the space to be able to see the ceiling all around.  I already had a white bath mat by Target Home.  

Here's the finished product...
  
Use your imagination to insert bamboo shades on this window...
I use this large ice bucket to hold our extra towels...
Rad mirror, one of many treasures found in my parents garage...
More on how I made this little shelving unit (which I saw in Southern Living) here)...
(by the way, I know it doesn't look like a boy uses this bathroom, but he does...his boy stuff hides in the cabinets)
Two hooks on the side of the cabinet to hang the towels we ACTUALLY use...
I also spray painted the knobs on these cabinets with a brown hammered metal spray paint to give them an oil rubbed bronze finish...
A little recap...
Before:
After:
Thanks for reading, I hope you like it.  It may be small...but it sure is cozy.  We love our little bathroom. 

Thursday, March 18, 2010

Mermaids

Sorry I've been postless for the past couple of weeks.

I've been busy because...

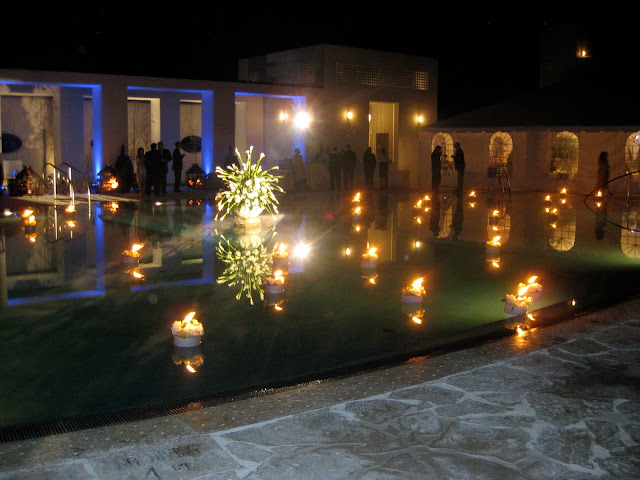
...We went to a wedding in Alys Beach, FL...
Beautiful couple, beautiful ceremony, beautiful decor, fabulous food.
Floating flower torches in the pool...
All the flowers in this cake are made of sugar!

And a mermaid...

Us...
We went with my parents...
Pretty fab, ehh?
The band was Tyrone, otherwise known as "Super T", which was so fun.
BeiBei was home with her mermaid... (Our dear friend, Alex, stayed at our house with her).


...We have been trying to keep up with the little raskel angel...
Here she is, showing how she can "sit".
 So far she can "sit", "drop it" (very useful for a teething puppy), and almost "come".

Last week she got her first bath...
It was pretty traumatic for her.


...I went to Atlanta for the day...
On Tuesday of this week, I met my mom and my sister Emily in Atlanta for the day.  I had to make some swaps and returns at IKEA and they were there for a few days visiting my aunt and getting out of town for a few days for Spring Break.  These pictures were taken at the Fernbank Natural History Museum.
Notice Amelia's mismatched shoes.  She made it out of the house that way when they left for Atlanta and they didn't pack any extras.  She sometimes dresses herself and comes up with the cutest wacky outfits...


More to come on a few around-the-house projects that have kept us busy as well!!

LinkWithin

Related Posts with Thumbnails