Showing posts with label house renovation. Show all posts

Tuesday, July 17, 2012

The progress of a work in progress

Well, it's been seven months since my last post!  Yikes.
If anyone still reads this thing...I have an update on what's been keeping me busy and away from the computer.

Firstly, Chris and I are expected a baby boy in less than a month!  Yay!  Due date is August 13th.

Secondly, although I'm also still decorating on my own, I've been working for another designer, the fabulous, Fran Keenan.  I'm learning a TON from her, and love getting to glean from her wisdom, experience, and talent!  You can see some of her work here in Birmingham Home and Garden and her own homes were featured in Southern Living this past year (I can't find the link for that one) and in Cottage Living a few years back.  She's keeping me busy, and away from the computer.

Thirdly, since April we have been under renovation.  We moved out for three months.  We are still not finished, but since the baby is coming soon and blogging will be pretty low on the totem pole, I thought I should at least show the progress of the project so far.

Our kitchen went from this...

To this...


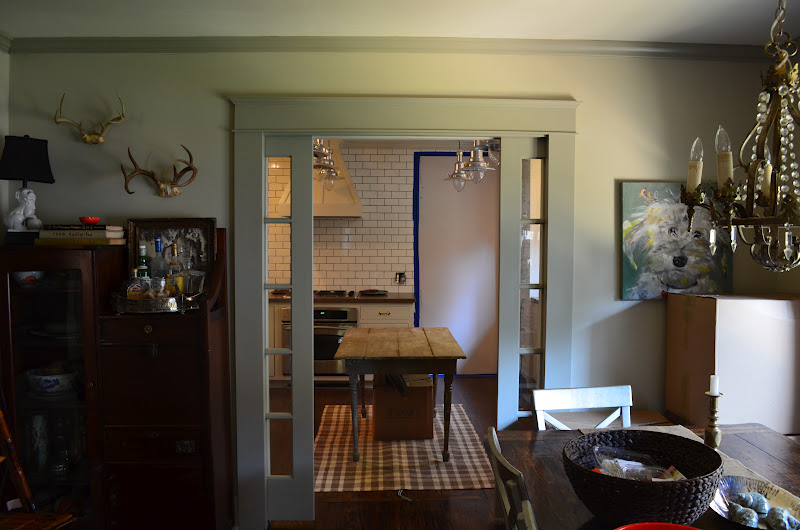
Now, it looks like this...
We uncovered lots of extra space, but eliminating a staircase down to our wet basement and installing a trap door in the kitchen floor instead.  

(It has not really been styled yet, and still has a box living under the table)


Grey sheet of drywall, that is taped off in blue tape, is sealing us off from the construction that continues in the back half of the house.  This will be a cased opening, just as it was before, which will now take you to a hallway with the laundry room, back door, and master bedroom (with new on-suite bath).


* Cabinets by Cannon Woodworking in Trussville, AL.  
* Countertops by Concrete Farmer in Trusville, AL.  


 So the layout in our dining room went from this...


To this...
(Dining room is full of boxes that we can't empty til the reno is over, and some extra furniture too)
By swagging the chandelier over, we have opened up traffic flow through the house, and given ourselves more living space.  To the left, when the metal filing cabinet (barely shown in picture) goes to its new spot, after reno is complete, there will even be room for a chair and ottoman there!  


The view all the way through...

Thanks for checking in!
 

Friday, October 28, 2011

KItchen Progress

My clients kitchen is moving right along...

Remember these before shots...


Well, things have been moving right along...

(Don't panic, the fridge will have matching cabinet door fronts on it!)


We've also moved this archway towards the entry way to expand their dining room...
(The above table, chairs, and light fixture may be for sale...email me if you're interested)


And we've gotten the floors refinished in something....not so orange!

I can't wait for this Restoration Hardware table to go in their new, spacious, dining room...
Shameless Plug:  If you live in North Alabama and order something from Restoration Hardware, your furniture will be delivered by the great guys from New Latitude Movers, which is the moving and delivery company where my husband works.

 With this chandelier for a little glitz...


Progress is fun!  

Thanks for checking in!


Thursday, October 14, 2010

Fixin' Up the Fixer Upper...

We've FINALLY been getting some real, professional, non-DIY work to our house this week.

We needed some fixin' on the brick on our house and had some rotten wood to replace.

So I left for work on Tuesday morning, and returned to this...


Wow.

Day 2 was about the same.  

But Day 3 is actually kinda nice...
We added a nifty little door so we can store things under the house.

The good news is...now that all the rotten wood has been replaced...we can paint our house!!!

The bad news is...we have to scrape the old paint off first....

by ourselves...

like with scrapers...

:(.

But I'm not going to think about that.  Instead I'm dreaming of what it will look like when it's done.  

A.
(lighter top, darker bottom)

or 

B.
(darker top, lighter bottom)

I'll remind you...the house currently looks something like this...
Except all my plants are dead.

...as a doornail.

Which one do you like best?

A, B, or something different altogether????

Come on....chirp up.  We need a little help.

We're going for awesome resale curb appeal, so you're opinion counts!

Thursday, February 18, 2010

The Money Pit- Crown Moulding

While I was running the painting operation, Chris was running the crown moulding operation.

Along with scraping the ceilings we knew that crown moulding would dramatically improve the look of our house as well as increase the appeal for future buyers.

Luckily, Chris and his dad had previously attempted to put crown moulding in one room of a house in college.  They pretty much botched it and probably de-valued the house...yikes.  So now, they felt like professionals.  But really, they had already made every classic mistake in the book and so this go round they felt pretty confident and got through it without any major mistakes (along with the help of our friends "Saint Alex", "Saint David", and another saint of a friend- "Saint Andrew").

One of the most trying parts of adding crown moulding to our house, was getting it from Home Depot back to our house.  We thought Home Depot had better prices on the crown moulding we wanted (but we were actually wrong and it was about the same).  But we were already there, so instead of purchasing from Lowe's right around the corner, we ended up at Home Depot which was about 15 miles away.

We made the trek over to Home Depot in Chris's Dad's truck.  We couldn't wait to purchase the gorgeous dental moulding we'd been planning for our home long before we even purchased it.  Boy did we feel silly when we realized how expensive it is!!!  So we got the standard crown moulding, which was fine, because dental moulding would probably be a little fancy and presumptuous for our little house anyway.

Dental Moulding...
What we got...
So, we went to Home Depot 15 miles away and all we had was Chris's dad's truck to transport 12 ft. long crown moulding.  One end of the crown moulding was in the bed of the truck, while the rest was extending forward over the top of the hood of the truck and some how strapped down with bungie cords and chris and his dad each had a had out the window holding on tight.  Right out of Home Depot, we had to descend down a long hill (for about 7 miles).  On the down hill, the wind was really whipping through the crown moulding and causing it to bend backwards.  It was really scary, and then before we knew it....CRACK!  We lost half of one.  It flew back into traffic.  I screamed and my heart stopped...it could have shattered someone's windshield and/or caused someone to run off the road.  Luckily, everyone was able to avoid it!  I've never been so ready to make it home after that.  I was terrified we were going to lose more.
But we made it home without anymore problems.  I don't know what the moral of the story is.  Should we have rented some sort of flat bed truck just to go buy crown moulding!?!  geez.

Here are the before and afters for the crown moulding.  We put crown moulding in every room except the little hallway and the kitchen (our cabinets go up to the ceiling).  Sorry I don't have better pictures.  

Living Room...

Bedroom Example...

A few tips:
- Paint walls and ceilings before putting up crown moulding.  You don't have to trim out corners perfectly, because the crown will cover most of it.  
- Lay the moulding strips across a couple of card tables and paint moulding outside BEFORE cutting or putting them up.  The sun will help dry them and it's so much easier to paint when it's not above you head.
(If you follow the above two steps, you won't have to do as much touch up painting later.)
- After hanging, don't forget to caulk up all the nail holes and caulk above and below each piece.  (Don't wait to do this after you move in, like us!  It's such a pain to go back and have to stand on top of furniture to caulk!)
- Because of this caulking step, I can see why many people paint their ceilings white and their crown moulding white...much less touching up to do when you use white caulk.  (I, on the other hand, painted my ceilings a beigey white and my crown moulding is grey....so I'll be caulking and touching up paint probably up until the day we sell the house!)
- To touch up after caulking, use a taping knife (mentioned in the painting post) to keep from doing more damage.  


BTW...I love woodwork!  I have hope and dreams of adding even more woodwork in our house.  It already has heavy craftsman style woodwork, and I love it.  I'm thinking of a recessed panel wainscote in the dining room...hmmm, and beadboard ceiling and walls in the kitchen...ahh.    

...if you likey to readee, then postey a commenty...

LinkWithin

Related Posts with Thumbnails